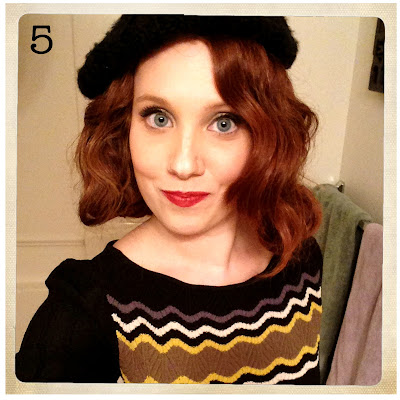
As I mentioned in my Weekend Adventures post, getting my hair to look somewhat accurate was quite the extensive process... This of course came as no surprise seeing as I have a ton of extremely unruly hair. I used this very basic tutorial from The Beauty Department which showed a few pictures with a brief write up as to how to get the look at home, so this was my basis.
(I apologize for my super awkward facial expressions in all of these pictures...)
1) I started by splitting up the bottom and top halves of my hair to eliminate some of the bulk. I then took the bottom half, split it into two, and made two little pigtail braids, which Tiffany helped me bobbi pin flat against the back of my head.
 |
| [[ before starting. braided hair. ]] |
2) Next came the curling process, which definitely took the longest because you have to use a tiny curling iron no larger than a quarter inch. Keep in mind that I was only working with the top half of my hair here... but just the left side took me about an hour. I was lucky enough to already own a tiny curling iron, but I think for future endeavors I will invest in an upgraded version considering mine came from Claires about twelve years ago. Anyway, for this step I took tiny sections of my hair, wrapped them around the curling iron, holding them in place, and then used bobbi pins to pin the little curls up against my head. The instructions of my tutorial specified to angle the iron towards your face the entire time, which I found a little confusing, but I did my best to figure out. Eventually with Tiffany's help I was able to get all of my hair pinned up.
 |
| [[ all of my hair curled and pinned up. ]] |
3) Ordinarily you will want to leave your hair in this state for as long as possible for the best results, but since we were on a bit of a time crunch I attempted to expedite the process by holding a hair dryer over my head for as long as I could stand it, which was somewhere in the area of fifteen minutes. At this point we started taking all of the curls down.
 |
| [[ after taking out the curls. after combing them out. ]] |
6) Finally take a bottle of hairspray and throw as much of that chemically loaded hair product as you can handle all over your hair. The nastier it feels when you are done, the better your chances of keeping the hair style in tact for a night. Needless to say, I was thrilled when I could shampoo my hair in the morning.
 |
| [[ the final product. ]] |
And that was that, I pinned my beret to my head, put on my dress, threw on some eye makeup and a red lip, slipped on my vintage looking kitty heels, grabbed my handgun, and was ready for action. Surprisingly my hair turned out really awesome and even held up for the night! Thanks largely of course to the help of my laaaaadies, Tiff and Megan. Thank you ladies!
